Hugo allow us to quickly create a blog (or any static website) and start creating content by writing markdown files. In order to deploy the website there are many solutions, such as Netlify, Google Firebase or Amazon S3… For my developer blog, I chose Gitlab Pages as it integrates easily with my project on Gitlab.
Gitlab configuration
Create a .gitlab-ci.yml file at the root of your project, and add the following code to automatically deploy your Hugo website at every merge to the master branch.
# All available Hugo versions are listed here: https://gitlab.com/pages/hugo/container_registry
image: registry.gitlab.com/pages/hugo:latest

stages:
  - build

variables:
  GIT_SUBMODULE_STRATEGY: recursive

pages:
  stage: build
  script:
    - hugo
  artifacts:
    paths:
      - public
  only:
    - master
If your project is private (or internal), you may have to open the visibility for Gitlab pages :
In Settings > General > Visibility, project features, permissions, the Pages feature should be enabled and set to everyone
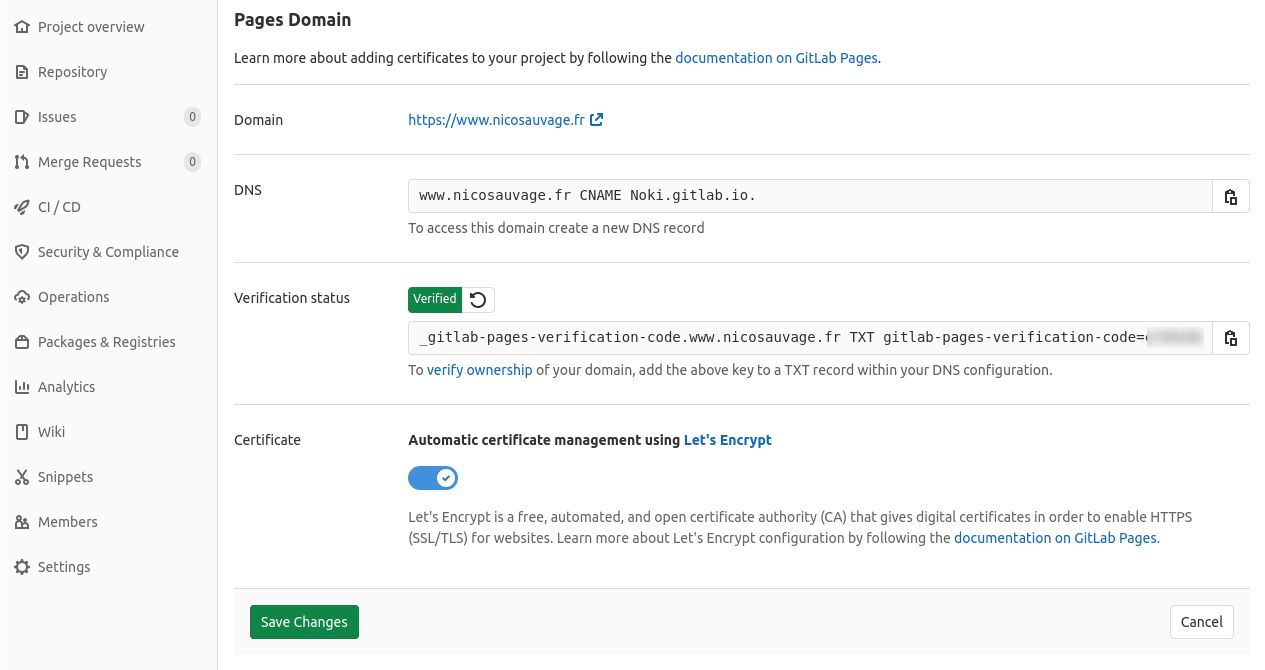
Gitlab Pages
- Click on new pages domain
- Set the domain field to your domain name, for instance “www.nicosauvage.fr”
- If your do not already have a certificate, leave Automatic certificate management using Let’s Encrypt checked
- Click on Create new domain
DNS configuration
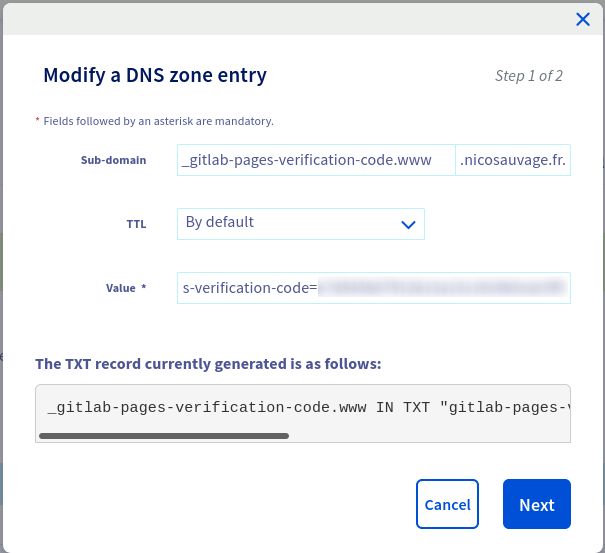
Create DNS record
As indicated in the Gitlab pages configuration page, we have to create a new DNS record to redirect our domain name to gitlab.io
The following steps will only work for a subdomain (for instance www.mysite.com). If you want to configure for a root domain, please see the documentation in the links at the bottom of this article.
- In your OVH dashboard, select the DNS zones tab, and click on Add an entry
- Select CNAME
- Set the same subdomain as defined in the Gitlab pages configurations (here www)
- Set the target as indicated by the Gitlab page myGitlabUsername.gitlab.io.. Do not forget the period at the end.
- Click on next and validate
Verify ownership
- Select TXT field type
- In subdomain, enter _gitlab-pages-verification-code.www
- Set value to gitlab-pages-verification-code=xxxxxxxxxxxxxxxxxxxxxxxxx
- In your Gitlab page configuration,
- Wait (a few minutes later, or hours)
- Click on the arrow next to “Unverified” (retry verification), the status should switch to “verified”
Links
https://docs.gitlab.com/ee/user/project/pages/custom_domains_ssl_tls_certification/